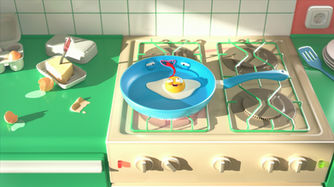
Kinky Kitchen
In Kinky Kitchen you get a glimpse of what your kitchen utensils get up to when you are not at home
My Roles: Pipeline TD, Look Development, Shading, Lighting & Compositing
Year: 2018, Director: Bea Höller, Produced at: Filmakademie Baden-Wuerttemberg
During the project we created a multiplayer Augmented Reality game and three animated episodes.
One of my tasks on the animated short was setting up a number of pipeline tools so that all artists in the team could work together properly.
Besides that my main task on the production was lighting and compositing. Here you can see some images from the three episodes:

Lighting
The aim of the lighting of the project was to create a very bright, warm atmosphere in the kitchen. To achieve this, we did not limit ourselves to realistic lighting conditions. In one of the episodes, for instance, we wanted to have more direct sunlight streaking across the frame. As the camera is panning from top to bottom we were losing the direct sunlight at the bottom of the kitchen. Therefore I created a light setup with several directional (sun) lights with slightly different angles so we would have more direct light present in the scene without the viewer noticing immediately.
Below you can see the lighting setups for all three episodes, rendered in clay. And beneath that is a wipe showing the shot's raw lighting and the final composite:

Look
The most enjoyable task of this production for me, was to play around with the look and lighting of the film. The director wanted to have clearly defined rims and outlines in the direct sunlight or caused by backlighting (Disney's "Feast" was our main lighting reference) combined with the look of plastic and rubber for the materials.
For shading, Steffen Oberle and I created fairly simple plastic materials with some procedural noises and hardly any textures.
To achieve the strong rim lights, I rendered a base lighting layer of the shot and several dedicated rim lights from different directions (6 in total). I used light colors (red, green, and blue) to render several lights into one layer. In compositing I separated the rim lights and added them on top of the base layer using a custom tool to control how much contribution each of the rim lights has on each of the objects. This workflow enabled a very art-directable rim light effect.
Below you can see a sketch of that workflow along with the references we used. And underneath you can see the effect of the dedicated rim lights on top of the base lighting layer by using the slider:

Full Video
You can watch all three episodes here on vimeo:


